How to Investigate Suspicious MFA Activity
A practical Microsoft Entra investigation workflow for suspicious MFA activity, from the first sign-in alert to correlation, persistence checks, containment, and post-compromise validation.
A user says they received an MFA prompt they did not expect.
A few minutes later, you find a successful sign-in for the same account.
At that point, the useful question is not simply "Did MFA pass?"
You need to answer a more important set of questions:
- What sign-in triggered or preceded the MFA challenge?
- Did the user actually perform MFA, or did an existing token satisfy the requirement?
- Which IP address, device, browser, and application were involved?
- Were there failed attempts before the success?
- Did the account register a new authentication method after access was granted?
- What did the account do next?
- Is there enough evidence to contain the account now?
This guide walks through that investigation from start to finish using Microsoft Entra logs.
Step 1: Open the Sign-In Logs First
In the Microsoft Entra admin center, go to:
Entra ID → Monitoring & health → Sign-in logs
Start with these filters:
- User: the affected test account,
alex@... - Date: the smallest useful window around the report, for example 15:25–16:25 UTC
- Status: All
- Sign-in type: start with Interactive user sign-ins
Do not filter only for successful events. The failures before a successful sign-in often explain what actually happened.
For each suspicious event, record these fields:
| Field | Why it matters |
|---|---|
CreatedDateTime | The event time you should use when rebuilding the authentication sequence |
UserPrincipalName | Confirms the affected identity |
AppDisplayName | Shows the application that initiated the sign-in |
ResourceDisplayName | Shows the resource the account attempted to access |
IPAddress | Lets you compare the sign-in with earlier activity and scope the IP across other users |
LocationDetails | Adds geolocation context, but should not be treated as proof of physical location |
DeviceDetail | Shows browser, OS, device ID, and available management/compliance context |
ClientAppUsed | Helps distinguish browser, modern client, or legacy client activity |
CorrelationId | Helps link activity that belongs to the same authentication trail |
OriginalRequestId | Can help identify the first request in an authentication sequence |
AuthenticationRequirement | Shows the highest authentication level required |
AuthenticationDetails | Shows the methods used, success/failure, and why an authentication step succeeded |
ConditionalAccessStatus | Shows whether Conditional Access succeeded, failed, or was not applied |
RiskLevelDuringSignIn / risk fields | Adds Entra ID Protection context when available |
Microsoft documents these values in the sign-in log activity details and the Azure Monitor SigninLogs table reference.
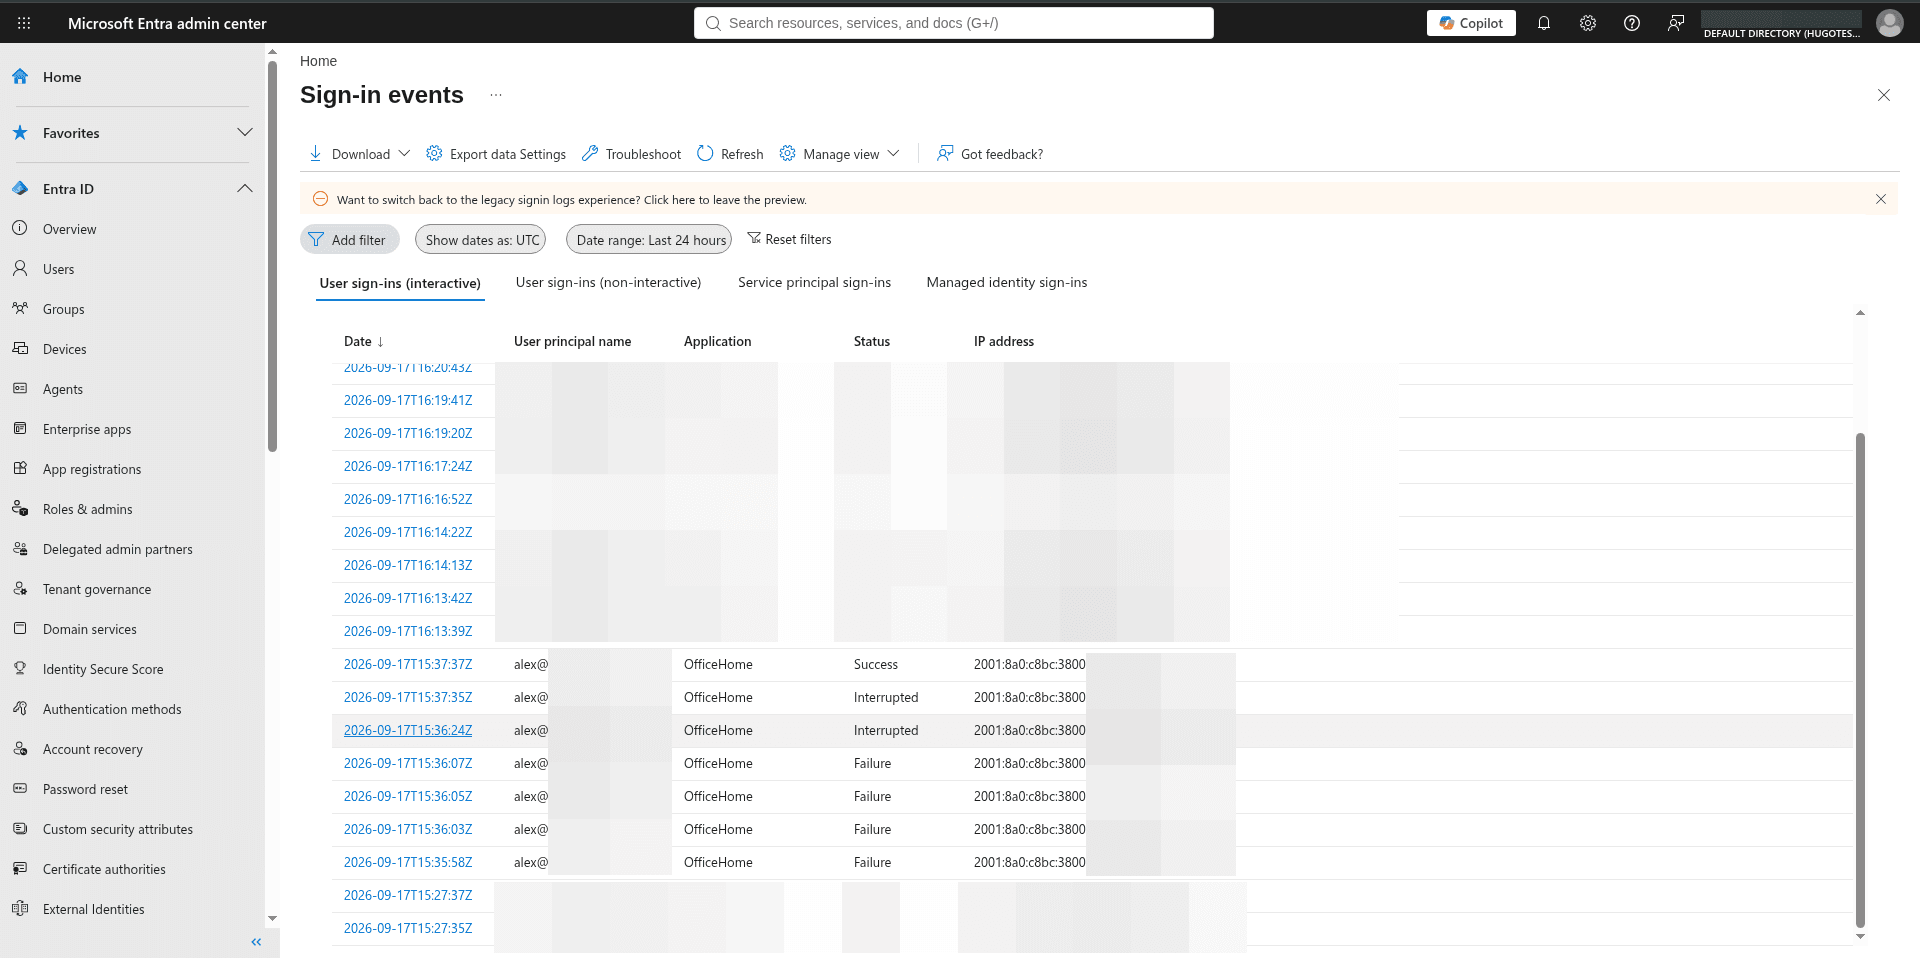
Figure 1 — Microsoft Entra interactive sign-in logs showing failed, interrupted, and successful authentication attempts for the test account from the same source IP.
Step 2: Open the Interrupted Event and Read Authentication Details
Now open the interrupted sign-in that occurred immediately after the first failures.
Go to Authentication Details.
This section is important because an interrupted sign-in can still tell you whether the primary credential was correct.
Microsoft Entra can satisfy an MFA requirement using authentication context from an existing token. The Authentication Details view can also show whether the sign-in used a fresh method such as Microsoft Authenticator, SMS, or another method, whether a token claim satisfied the requirement, or whether only the password step completed.
For the suspicious event, capture:
- Authentication method
- Authentication step result
- Authentication step detail
- Result detail
- Requirement source
- Whether the password was correct
- Whether MFA was freshly performed
- Whether a token claim satisfied the requirement
In this lab scenario, assume the suspicious event shows:
2026-09-17T15:36:24Z
Application: OfficeHome
Status: Interrupted
IP: 2001:8a0:c8bc:3800:...

Authentication details:
Password                         Succeeded: Yes
Result detail                    Correct password
That tells us the primary credential was valid, even though the sign-in did not complete at that moment.
Now compare that with the events immediately before it.
Suppose you find:
15:35:58  OfficeHome    Failure       2001:8a0:c8bc:3800:...
15:36:03  OfficeHome    Failure       2001:8a0:c8bc:3800:...
15:36:05  OfficeHome    Failure       2001:8a0:c8bc:3800:...
15:36:07  OfficeHome    Failure       2001:8a0:c8bc:3800:...
15:36:24  OfficeHome    Interrupted   2001:8a0:c8bc:3800:...
15:37:35  OfficeHome    Interrupted   2001:8a0:c8bc:3800:...
15:37:37  OfficeHome    Success       2001:8a0:c8bc:3800:...
16:13:39  OfficeHome    Interrupted   2001:8a0:c8bc:3800:...
16:13:42  OfficeHome    Success       2001:8a0:c8bc:3800:...
16:14:13  My Signins    Interrupted   2001:8a0:c8bc:3800:...
16:14:22  My Signins    Interrupted   2001:8a0:c8bc:3800:...
16:17:24  Azure Portal  Success       2001:8a0:c8bc:3800:...
16:19:20  Azure Portal  Success       2001:8a0:c8bc:3800:...
16:19:41  My Signins    Success       2001:8a0:c8bc:3800:...
This sequence is much more important than the single successful row.
The same IP, repeated failures, interrupted flows, later successful sign-ins, and activity in My Signins and Azure Portal fit a suspicious authentication sequence. It still does not prove compromise, but it gives you a concrete hypothesis to test.
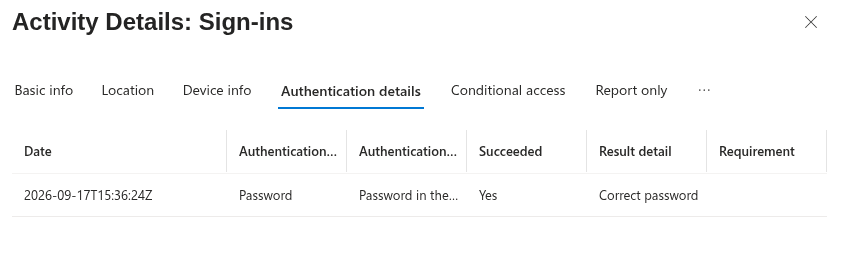
Figure 2 — Authentication Details for the test account showing successful primary authentication with the correct password.
Step 3: Correlate the Event Instead of Reading Rows in Isolation
A portal view is useful for the first pass. If your Entra logs are sent to Log Analytics or Microsoft Sentinel, query the same window so you can compare events quickly.
Start with the affected user:
let user = "alex@...";
let start = datetime(2026-09-17 15:25:00);
let end = datetime(2026-09-17 16:25:00);

SigninLogs
| where UserPrincipalName =~ user
| where CreatedDateTime between (start .. end)
| project
    CreatedDateTime,
    UserPrincipalName,
    AppDisplayName,
    ResourceDisplayName,
    ResultType,
    ResultDescription,
    IPAddress,
    LocationDetails,
    ClientAppUsed,
    DeviceDetail,
    AuthenticationRequirement,
    AuthenticationDetails,
    ConditionalAccessStatus,
    CorrelationId,
    OriginalRequestId,
    UserAgent
| order by CreatedDateTime asc
The goal is to build one ordered view of the authentication activity.
Then take the CorrelationId from the suspicious event and search for other events that share it:
let correlation = "PASTE-CORRELATION-ID-HERE";

SigninLogs
| where CorrelationId == correlation
| project
    CreatedDateTime,
    UserPrincipalName,
    AppDisplayName,
    ResourceDisplayName,
    ResultType,
    ResultDescription,
    IPAddress,
    AuthenticationRequirement,
    AuthenticationDetails,
    DeviceDetail,
    CorrelationId
| order by CreatedDateTime asc
Do not assume every event around the same time will share one correlation ID. Use it as one linkage point, then compare time, user, IP, application, session, and request identifiers as well.
Step 4: Compare the Suspicious Sign-In With the User's Normal Activity
Now widen the window.
Look at the user's previous successful sign-ins, not just the incident period.
A useful comparison window might be the previous 7 to 30 days, depending on how frequently the account signs in.
let user = "alex@...";

SigninLogs
| where UserPrincipalName =~ user
| where CreatedDateTime > ago(14d)
| where ResultType == 0
| project
    CreatedDateTime,
    IPAddress,
    AppDisplayName,
    ClientAppUsed,
    DeviceDetail,
    UserAgent,
    LocationDetails,
    AutonomousSystemNumber
| order by CreatedDateTime desc
Compare the suspicious event with the baseline:
- Has the user used this IP before?
- Has the user signed in from this ASN before?
- Is the browser normal for this user?
- Does the device ID match a known device?
- Is the device managed or compliant?
- Is the application one the user normally accesses?
- Is the user agent consistent with previous activity?
In this scenario, assume the previous two weeks show:
Normal activity
IP range: corporate VPN and home ISP
Applications: OfficeHome and expected productivity apps
ASN: previously observed

Suspicious event
IP: 2001:8a0:c8bc:3800:...
Applications: OfficeHome, My Signins, Azure Portal
Pattern: failures, interrupted events, successful sign-ins, then security-info registration
None of those differences proves compromise alone.
Together with the correct-password evidence, interrupted flows, later successful sign-ins, and security-info activity, they increase confidence that the sign-in needs escalation.
Check the IP Across the Tenant
Do not stop at the user.
Search the same IP across other identities:
let suspiciousIpPrefix = "2001:8a0:c8bc:3800";

SigninLogs
| where IPAddress startswith suspiciousIpPrefix
| where CreatedDateTime > ago(24h)
| summarize
    SignIns = count(),
    Users = make_set(UserPrincipalName, 100),
    Apps = make_set(AppDisplayName, 50),
    Results = make_set(ResultType, 20)
  by IPAddress
If the IP attempted to authenticate to many accounts in a short period, you may be looking at a broader credential attack rather than one isolated user.
You can also list the raw events:
let suspiciousIpPrefix = "2001:8a0:c8bc:3800";

SigninLogs
| where IPAddress startswith suspiciousIpPrefix
| where CreatedDateTime > ago(24h)
| project
    CreatedDateTime,
    UserPrincipalName,
    AppDisplayName,
    ResultType,
    ResultDescription,
    UserAgent,
    CorrelationId
| order by CreatedDateTime asc
In the next screenshot, the same source IP appears across multiple test identities and applications, including Azure Portal and My Signins. In production, this is where you separate a shared legitimate network from a broader authentication attack.
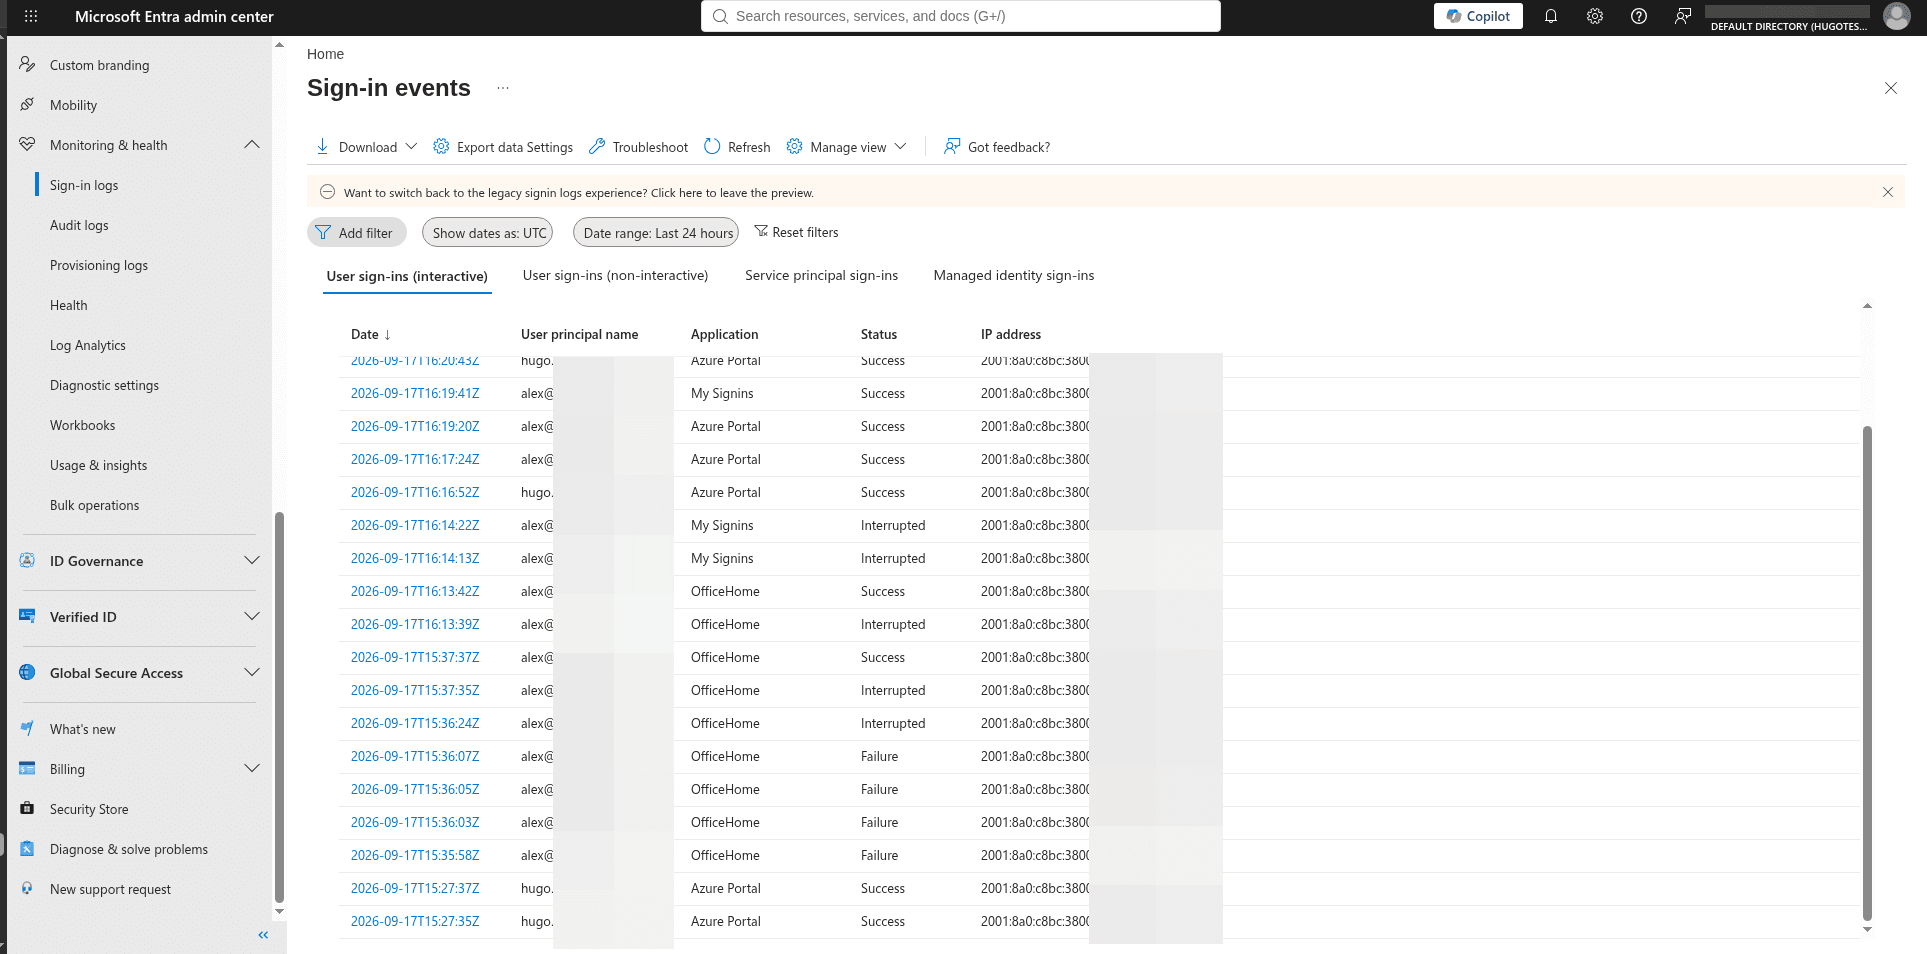
Figure 3 — Microsoft Entra sign-in activity filtered to the test user, showing the authentication sequence in chronological order.
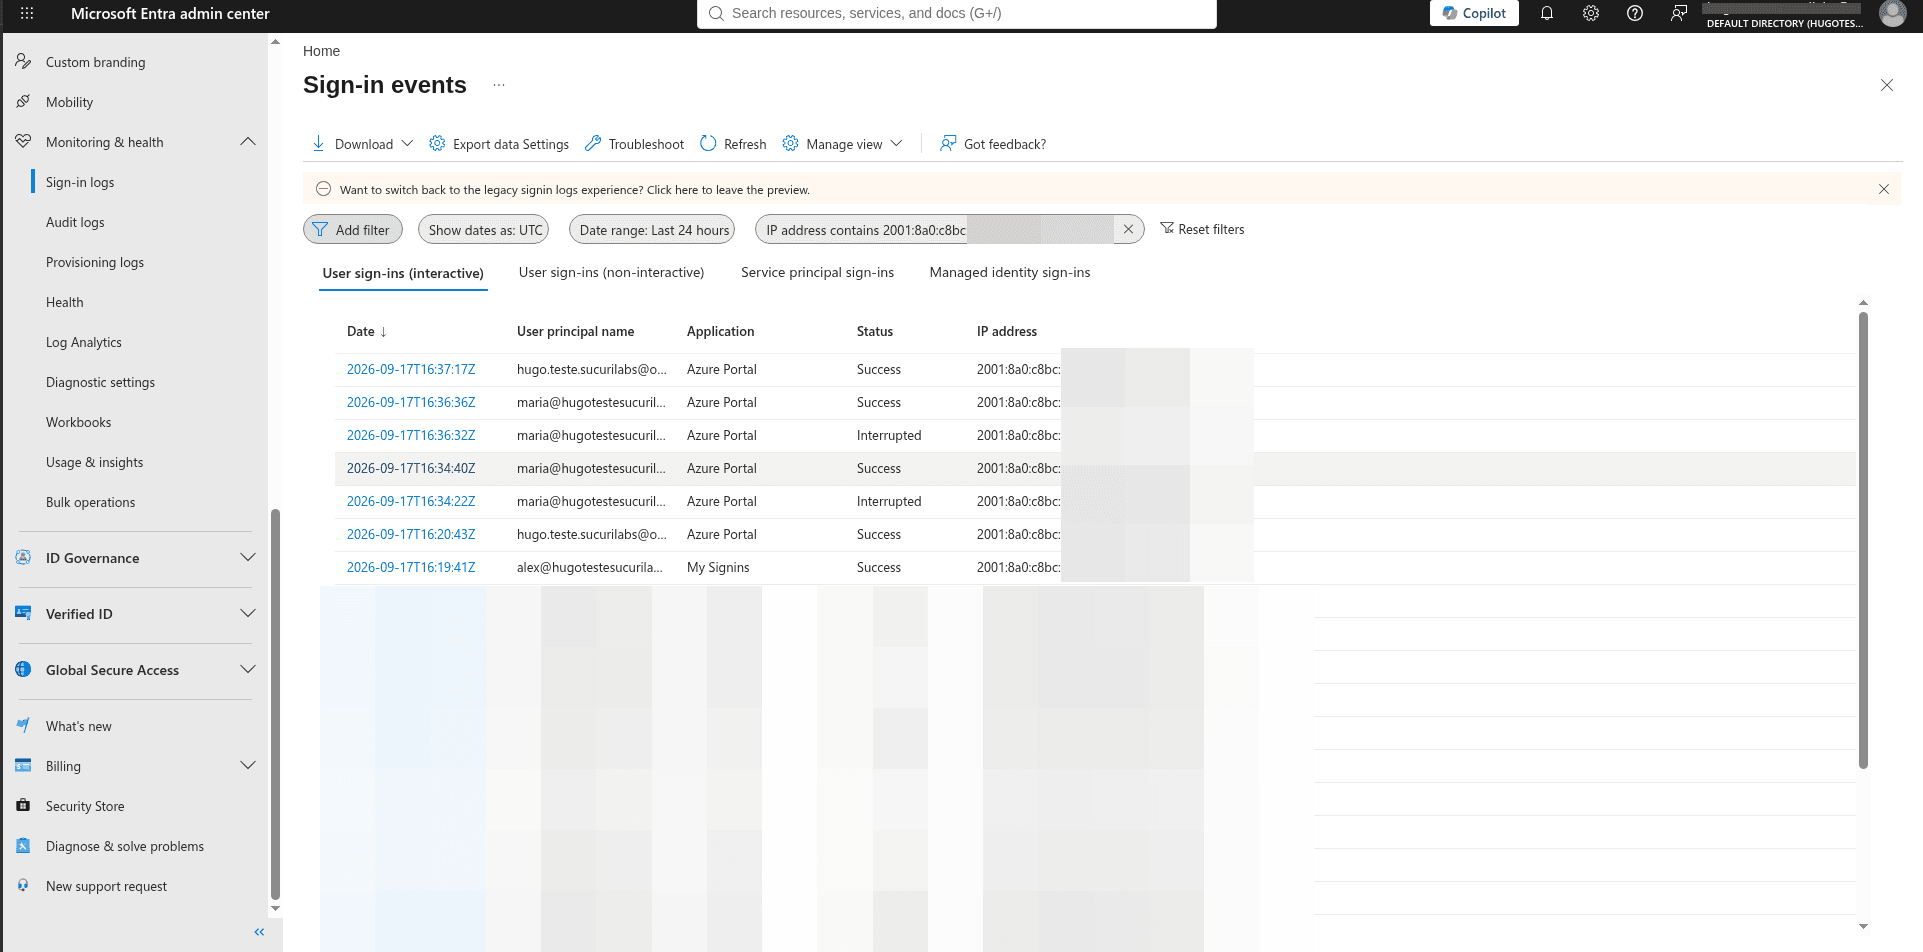
Figure 4 — Sign-in activity filtered by source IP. Searching the same IP across the tenant helps determine whether suspicious authentication activity is isolated to one account or appears across multiple identities.
Step 5: Check Whether the Account Added or Changed an Authentication Method
If an attacker gained access, they may try to create persistence.
Open:
Entra ID → Monitoring & health → Audit logs
Filter around the same time window and look for authentication-method activity such as:
User registered security infoUser changed default security infoUser deleted security infoUser updated security infoAdmin registered security infoAdmin updated security info
Microsoft maintains these operation names in the Entra audit activity reference.
Be careful with time zones. The sign-in screenshots in this lab are shown in UTC, while the audit log screenshot is shown in local time. On September 17, 2026, 5:19 PM local time in the screenshot corresponds to 16:19 UTC.
If your audit logs are in Log Analytics, use a query like this:
let user = "alex@...";
let start = datetime(2026-09-17 15:25:00);
let end = datetime(2026-09-17 16:30:00);

AuditLogs
| where TimeGenerated between (start .. end)
| where tostring(TargetResources) has user
| where OperationName in (
    "User registered security info",
    "User changed default security info",
    "User deleted security info",
    "User updated security info",
    "Admin registered security info",
    "Admin updated security info"
)
| project
    TimeGenerated,
    OperationName,
    Result,
    InitiatedBy,
    TargetResources,
    CorrelationId
| order by TimeGenerated asc
Assume our lab investigation finds:
15:37:37 UTC  OfficeHome sign-in succeeds
16:13:42 UTC  OfficeHome sign-in succeeds again
16:17:24 UTC  Azure Portal sign-in succeeds
16:19:10 UTC  User registered security info
16:19:11 UTC  User registered Authenticator app with notification
16:19:14 UTC  User registered all required security info
At this point, the investigation changes significantly.
A sequence of suspicious sign-ins followed by new authentication information is a strong persistence indicator.
Do not immediately delete the method before you record the evidence.
Capture:
- Operation name
- Timestamp
- Target user
- Initiator
- Correlation ID
- Available modified properties
- Method type, if visible in the event or authentication-method inventory
The audit log also shows why context is important, an admin-registered phone method can appear in the same time period as user-registered security information. Record the initiator and method type before deciding which entries are legitimate recovery activity and which entries may be attacker persistence.
Then compare the user's currently registered methods with what they actually recognize.
For a direct inventory, Microsoft Graph can retrieve a user's registered authentication methods:
GET https://graph.microsoft.com/v1.0/users/{user-id}/authentication/methods
Use the least-privileged permissions appropriate for your investigation process.
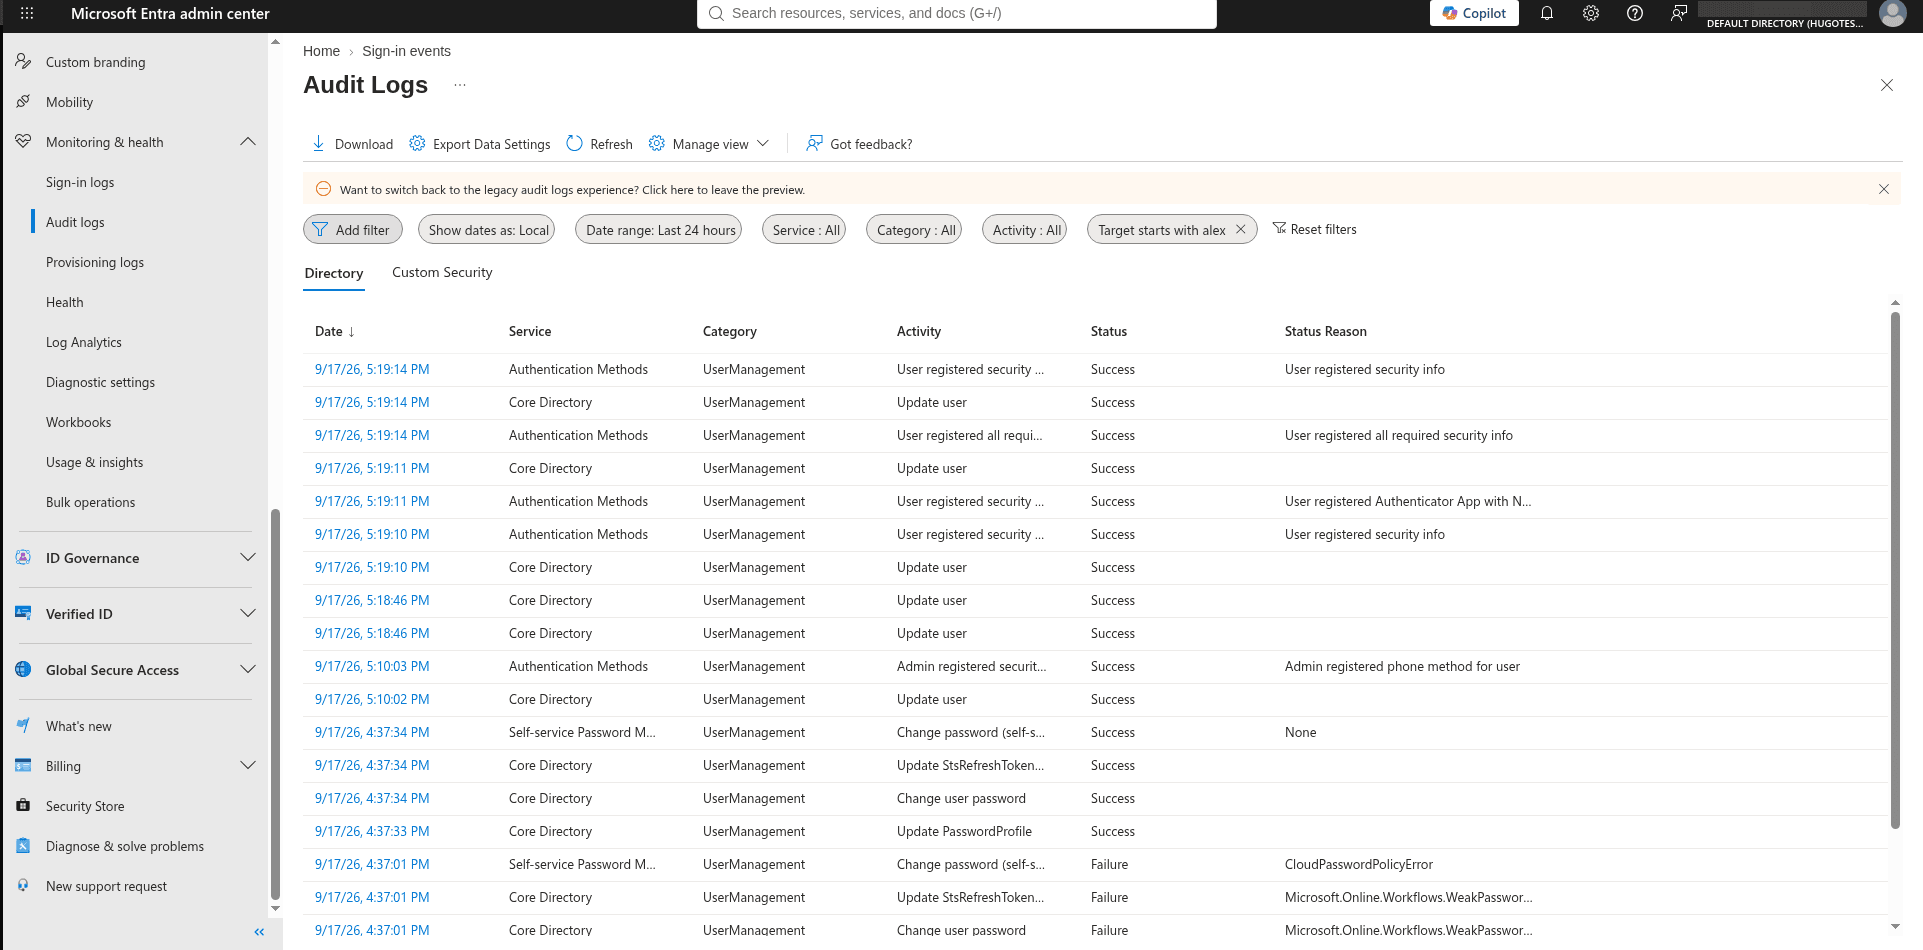
Figure 5 — Microsoft Entra audit logs showing the registration of new security information, including a Microsoft Authenticator method, for the test account.
Step 6: Check What Happened After the Suspicious Sign-In
Successful authentication is not the end of the incident.
Now move forward in time.
Ask what resources the account accessed after the suspicious sign-in.
Start by querying the user's successful sign-ins after the event:
let user = "alex@...";
let suspiciousSuccessTime = datetime(2026-09-17 15:37:37);

SigninLogs
| where UserPrincipalName =~ user
| where CreatedDateTime between (suspiciousSuccessTime .. suspiciousSuccessTime + 2h)
| where ResultType == 0
| project
    CreatedDateTime,
    AppDisplayName,
    ResourceDisplayName,
    IPAddress,
    DeviceDetail,
    ClientAppUsed,
    CorrelationId
| order by CreatedDateTime asc
Look for applications or resources the user does not normally access.
If the account reached Exchange Online, SharePoint, Teams, Azure management, an administrative portal, or another sensitive workload, continue the investigation in that workload's audit logs.
The exact post-authentication checks depend on what the account can access.
For example, in an Exchange investigation you would want to know whether the attacker created or changed inbox rules, accessed messages, or performed other mailbox actions. In an administrative account investigation, you would review directory changes, role changes, application changes, and privileged operations.
The important point is to follow the access.
Do not close the investigation because the initial sign-in event itself has been explained.
Step 7: Ask the User Questions That Can Confirm or Break the Hypothesis
Contact the user through a trusted channel.
Do not rely on email or Teams if you think the account itself may be compromised.
Avoid asking only:
"Did you approve an MFA prompt?"
Ask questions tied to the evidence:
- Were you signing in around 15:36–15:37 UTC?
- Were you accessing OfficeHome, My Signins, or Azure Portal?
- Did you receive or interact with Microsoft Authenticator prompts during that window?
- Were you connected through the network associated with the source IP prefix
2001:8a0:c8bc:3800? - Did you add or change Microsoft Authenticator, phone, or other security information around 16:19 UTC?
- If an admin or help desk changed a method for you, who performed that action and why?
This makes the user's answer useful to the investigation.
In this case, assume the user confirms:
- They were not signing in.
- They were not accessing OfficeHome, My Signins, or Azure Portal.
- They did receive unexpected prompts.
- They did not register a new Microsoft Authenticator method.
- They did not request an admin-registered method at that time.
You now have user confirmation that supports the technical evidence.
Step 8: Decide Whether You Have Enough Evidence to Contain
Do not wait for every possible log source when the evidence already indicates active compromise.
Contain immediately when you have combinations such as:
- The user confirms they did not initiate the sign-in.
- A successful sign-in follows multiple failures or interrupted events from the same source IP.
- Authentication details show a correct password before the sign-in completes.
- The sign-in comes from an unfamiliar IP, device, or user agent and does not match the user's normal activity.
- A new authentication method appears immediately after suspicious access.
- The account performs unexpected activity after the sign-in.
- Entra ID Protection or another identity-security system raises high-confidence compromise signals.
- The same infrastructure is attempting access to multiple users.
A single unfamiliar location is not enough.
A location estimate can be wrong because of VPNs, mobile networks, proxies, and cloud services.
Step 9: Contain the Account
Once you confirm compromise, move from investigation to containment.
Microsoft's emergency access guidance and risk remediation guidance document several administrative actions for compromised identities. The exact order depends on your environment, but a practical response is:
- Block the user from signing in when you believe the attacker still has working credentials or an MFA path.
- Revoke the user's sessions so existing refresh tokens are invalidated and applications must reauthenticate.
- Reset the password using your organization's compromised-account process.
- Require MFA re-registration when you cannot trust the existing methods.
- Remove authentication methods the user does not recognize after preserving the evidence you need.
- Disable or isolate compromised devices if the evidence points to endpoint compromise.
- Confirm the user or sign-in as compromised in Entra ID Protection when applicable.
- Investigate post-authentication activity and reverse attacker changes such as persistence mechanisms.
- Search for the same indicators across other users before declaring the incident contained.
In the Entra admin center, authentication administrators can manage actions such as password reset, requiring MFA re-registration, and revoking sessions from the user's authentication methods page.
Be careful with Require re-register MFA. Microsoft documents that this action removes several existing MFA methods, including Microsoft Authenticator registrations, phone numbers, and software OATH tokens. Use it deliberately as part of recovery, not as an exploratory step.
Step 10: Rebuild the Final Timeline
At the end of the investigation, you should be able to explain the incident chronologically.
For our lab scenario, the final timeline is:
| Time (UTC) | Evidence | Interpretation |
|---|---|---|
| 15:35:58–15:36:07 | Multiple OfficeHome failures from the same source IP | Initial authentication attempts fail |
| 15:36:24 | OfficeHome sign-in is interrupted, but Authentication Details show Correct password | Primary credential appears valid, even though the flow is not complete |
| 15:37:35 | OfficeHome sign-in is interrupted again | Authentication flow continues from the same source |
| 15:37:37 | OfficeHome sign-in succeeds from the same source IP | Access is granted |
| 16:13:39–16:13:42 | OfficeHome interruption followed by success | Activity resumes from the same source |
| 16:14:13–16:14:22 | My Signins events are interrupted | Account moves toward security or profile-related pages |
| 16:17:24–16:19:41 | Azure Portal and My Signins sign-ins succeed | Post-authentication portal activity occurs |
| 16:19:10–16:19:14 | Security information and Microsoft Authenticator registration events appear in audit logs | Possible persistence through new authentication methods |
| Later | User confirms the activity was not theirs | Technical evidence and user statement align |
| Later | Account blocked, sessions revoked, password reset, and MFA recovery started | Containment and recovery begin |
That timeline is the output of the investigation.
Not the MFA alert.
What Should Go Into the Incident Record
Before you close the case, preserve enough evidence that another analyst can reproduce your conclusion.
Record:
- Affected user
- First suspicious timestamp
- Successful compromise timestamp, if confirmed
- Source IP and ASN
- Application and resource
- Device and browser details
- User agent
- Correlation ID
- Original request ID where useful
- Authentication method sequence
- Conditional Access outcome
- Risk detections
- Authentication-method changes
- Post-authentication resource access
- User confirmation
- Containment actions
- Time containment started
- Scope checks for other users
If your conclusion is "benign", document why.
If your conclusion is "compromised", document which evidence crossed the threshold.
To understand the attack techniques behind suspicious MFA activity, read our guide to MFA bypass.